Tomorrow is Anjalie's fourth birthday party. Part of me is still amazed thinking "has it been that long?!" This year she asked for a Peppa Pig cake. Well, you can never have too much Peppa Pig (at least in our home). Last year, she was totally engrossed in Thomas Tank Engine and asked for "Choo-choo train". At least, she keeps me busy, lol! Along with Peppa Pig her next favourite TV show is number jacks. So I thought to combine the two together for her cake. I really do enjoy making these for her. This time around I actually managed to take a few pictures of the making process. So here they are..
 You will need:
one round 9 inch cake (of your favourite flavour)
Chocolate frosting/buttercream icing or any of your favourite icing.
Fondant/royal icing:
Grass green - 1 kg
Lincoln green/bottle green - 200 gm
Red - 200 gm
Chocolate - 100 gm
Yellow - 200 gm
Blue - 100 gm
white - 100 gm
Black - 25 gm
Pale pink/Flesh - 100 gm
Edible glue/water - as needed
Edible Tylose powder - 2 tbsp
Before we go to the Peppa Pig cake...here are few picture of my "Choo-choo train" cake for her last year and it was my first attempt at using fondant. For this cake, I did not make any figurines or anything that needed setting. So I first baked two 1/2 train shaped cakes using Wilton choo-choo train pan. Simply, poured the 1.5 kg of chocolate cake batter into the two halves and baked them. I left them to cool over night and iced them together with chocolate frosting. I then rolled out the blue fondant and covered the cake as evenly as possible, decorated with chocolate buttons and marshmallows. For the coach, I baked 1/2 kg cake batter in a loaf pan, cut it in half, sandwiched them and iced them together. I then covered it with red fondant and decorated it with chocolate buttons.


This time though, I planned to make two round cakes and sandwich them together and simply decorate with Peppa and George figurines. These figurines and ornaments are made from edible materials and had to dry over night. So I started making them first before baking the cake.
 For making any kind of figurines, flowers or any other ornaments (like the sun) you can add a very small pinch of the Tylose powder to the small amount of fondant to get the modelling paste. Simply take a piece of fondant (shown in the pic) add a small pinch of the tylose powder and knead until the fondant stops cracking and becomes more stretchy. You will definitely be able to tell when it happens. This is my first time with it too and I felt a marked difference in the feel of the fondant.

Make sure to keep the modelling paste in a zip lock/plastic bag/keep it covered when not using it. They tend to dry out very quickly. They are excellent in keeping the shapes you are making. See for example, Peppa's boots/wellies in the pic left.

They make excellent flowers, butterflies or anything that takes your fancy. Egg cartons are excellent to set the flowers and butterflies to dry as they give the lovely curves to the flowers and flap to the butterfly wings to help with the 3-D look.

We even made a Sun. Here is my first Sun for Peppa. Inserting a tooth pick while the modelling paste is wet will allow me to insert the Sun easily into the cake. But the Sun looked a bit large compared to the rest of the figurines so Anjalie and I ate it and discarded the tooth pick :)

Anjalie who is ever helpful in the kitchen enjoyed kneading the fondant and the tylose powder together. Here she is helping me make George.

Here are Peppa and George. But in our excitement to eat the Sun, we forgot their ears!

But it was sorted in no time, whew!

It was partially cloudy day here. So we went with that instead or a sunny day. Again tooth picks inserted while the paste is still wet makes it easier to insert the cloudy day into the cake easily.

Anjalie wanted number jacks too. So here is number jack 4. She giggled for a while at his smile. You never know what sets them off :)

Of course, the name of the special person...
It is time to put all these together. First I baked two 9 inch Chocolate cakes (1 kg cake batter in total).

Allowed them to cool and settle overnight and frosted them with chocolate icing.

Next I rolled out the grass green fondant and covered the cakes. Don't worry about the mess, I covered them with grass :) Never use modelling paste (fondant +tylose powder) to cover the entire cake. They will dry into hard candies!

Next, I covered the bottom edge with grass made from darker green fondant. I simply made this shape using a sharp kitchen knife by cutting rectangular strips and the snipping them to form grass using kitchen scissors.

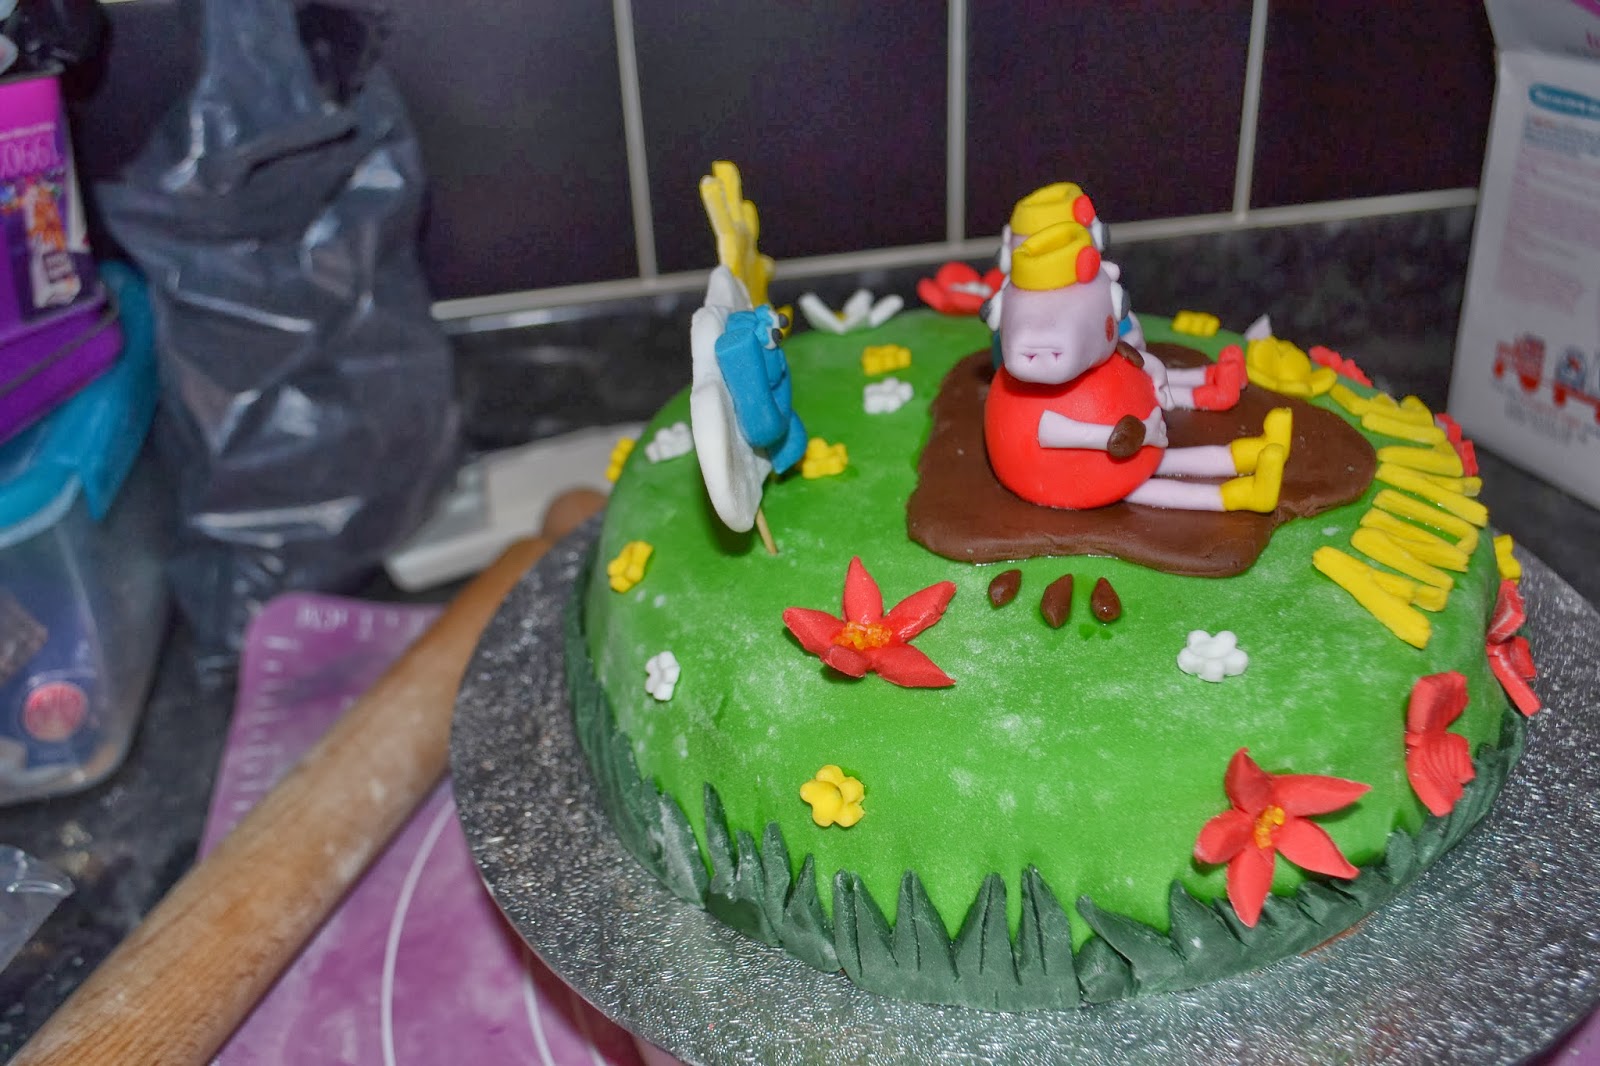
Next make muddy puddles with chocolate fondant (including few splashes).

Decorate with the rest of the ornaments.


However, while packing the cake two of the sun's rays broke. They do dry hard and get brittle. So to avoid any mishaps when transporting, we went with a simpler sun and covered the tooth pick (that was showing with more green modelling paste)...see below
Your Peppa pig cake is ready! Happy Birthday to my dearest Angel, Anjalie!
 You will need:
one round 9 inch cake (of your favourite flavour)
Chocolate frosting/buttercream icing or any of your favourite icing.
Fondant/royal icing:
Grass green - 1 kg
Lincoln green/bottle green - 200 gm
Red - 200 gm
Chocolate - 100 gm
Yellow - 200 gm
Blue - 100 gm
white - 100 gm
Black - 25 gm
Pale pink/Flesh - 100 gm
Edible glue/water - as needed
Edible Tylose powder - 2 tbsp
Before we go to the Peppa Pig cake...here are few picture of my "Choo-choo train" cake for her last year and it was my first attempt at using fondant. For this cake, I did not make any figurines or anything that needed setting. So I first baked two 1/2 train shaped cakes using Wilton choo-choo train pan. Simply, poured the 1.5 kg of chocolate cake batter into the two halves and baked them. I left them to cool over night and iced them together with chocolate frosting. I then rolled out the blue fondant and covered the cake as evenly as possible, decorated with chocolate buttons and marshmallows. For the coach, I baked 1/2 kg cake batter in a loaf pan, cut it in half, sandwiched them and iced them together. I then covered it with red fondant and decorated it with chocolate buttons.


This time though, I planned to make two round cakes and sandwich them together and simply decorate with Peppa and George figurines. These figurines and ornaments are made from edible materials and had to dry over night. So I started making them first before baking the cake.


Make sure to keep the modelling paste in a zip lock/plastic bag/keep it covered when not using it. They tend to dry out very quickly. They are excellent in keeping the shapes you are making. See for example, Peppa's boots/wellies in the pic left.

They make excellent flowers, butterflies or anything that takes your fancy. Egg cartons are excellent to set the flowers and butterflies to dry as they give the lovely curves to the flowers and flap to the butterfly wings to help with the 3-D look.

We even made a Sun. Here is my first Sun for Peppa. Inserting a tooth pick while the modelling paste is wet will allow me to insert the Sun easily into the cake. But the Sun looked a bit large compared to the rest of the figurines so Anjalie and I ate it and discarded the tooth pick :)

Anjalie who is ever helpful in the kitchen enjoyed kneading the fondant and the tylose powder together. Here she is helping me make George.

Here are Peppa and George. But in our excitement to eat the Sun, we forgot their ears!

But it was sorted in no time, whew!

It was partially cloudy day here. So we went with that instead or a sunny day. Again tooth picks inserted while the paste is still wet makes it easier to insert the cloudy day into the cake easily.

Anjalie wanted number jacks too. So here is number jack 4. She giggled for a while at his smile. You never know what sets them off :)

Of course, the name of the special person...
It is time to put all these together. First I baked two 9 inch Chocolate cakes (1 kg cake batter in total).

Allowed them to cool and settle overnight and frosted them with chocolate icing.

Next I rolled out the grass green fondant and covered the cakes. Don't worry about the mess, I covered them with grass :) Never use modelling paste (fondant +tylose powder) to cover the entire cake. They will dry into hard candies!

Next, I covered the bottom edge with grass made from darker green fondant. I simply made this shape using a sharp kitchen knife by cutting rectangular strips and the snipping them to form grass using kitchen scissors.

Next make muddy puddles with chocolate fondant (including few splashes).

Decorate with the rest of the ornaments.

However, while packing the cake two of the sun's rays broke. They do dry hard and get brittle. So to avoid any mishaps when transporting, we went with a simpler sun and covered the tooth pick (that was showing with more green modelling paste)...see below
Your Peppa pig cake is ready! Happy Birthday to my dearest Angel, Anjalie!
I hope these give you a few ideas for your next cake :)
No comments:
Post a Comment
Thank you for visiting and taking the time and effort to leave a comment.